The Score and Snap Method
This is the primary technique for straight cuts. Faster and cleaner than any saw.
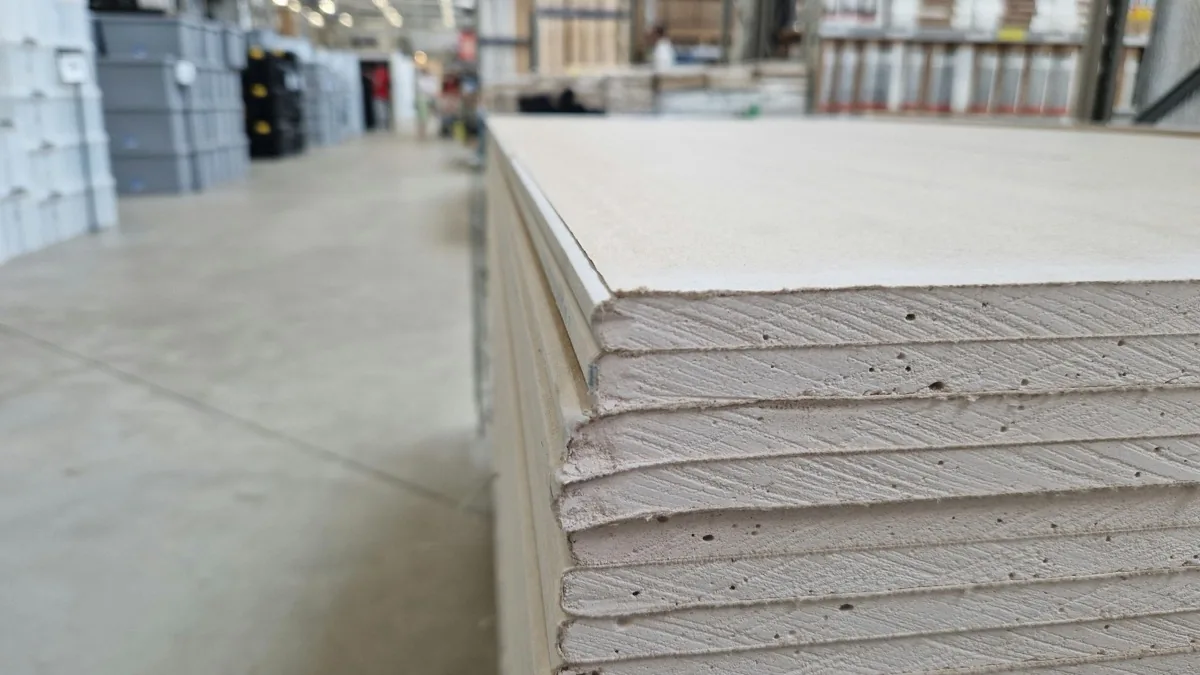
Mark your cut line on the face of the drywall. Use a T-square or straightedge for accuracy. For long cuts, I snap a chalk line.
Score through the paper facing with a utility knife. You're just cutting the paper, not trying to cut through the gypsum. One firm pass is usually enough. A dull blade tears rather than cuts, so keep your blades fresh.
Stand the sheet up on its edge and give a sharp push on the back side at the score line. The gypsum snaps cleanly along the score. Then fold the sheet back and cut the back paper to separate the pieces.
The edges are cleaner than any saw cut. No dust, no ragged gypsum, just a straight break. This is why pros rarely use saws for straight cuts.
Cutting for Outlet and Switch Boxes
These cutouts intimidate beginners but become routine quickly. There are two main approaches.
Measurement Method
Measure from a reference point, usually the edge of the adjacent sheet or the corner of the room, to each edge of the electrical box. Then measure from the floor or ceiling to the top and bottom of the box.
Transfer these measurements to your sheet. Mark the rectangle of the box on the face. Double-check by comparing distances to another reference point.
Cut the outline with a drywall saw or rotozip. Cut slightly inside your marks. You can trim larger but can't add material back. A little gap around the box is fine and will be covered by the outlet cover plate.
Chalk Method
Rub chalk on the edges of the electrical boxes. Position your sheet and press it against the boxes. The chalk transfers the box outlines to the back of the drywall.
Flip the sheet over and cut along the chalk marks from the back side. This is faster than measuring once you get the technique down.
I use this method when there are multiple boxes in one sheet. Measuring each one individually takes forever.
Using a Rotozip
A rotozip or similar spiral saw changed how I cut around boxes. Instead of measuring, you hang the sheet over the boxes and then plunge cut from the face to free the material.
The technique: Position the sheet, driving a couple screws to hold it. Find a box by tapping gently on the drywall. Plunge the rotozip bit into the drywall inside the box perimeter, then follow the box edges around. The bit rides along the outside of the electrical box.
Done right, this is incredibly fast. Done wrong, you cut wires. The first few times, verify your bit is actually inside the box before cutting. Once you develop the feel for it, it becomes second nature.
I don't use the rotozip for every cutout. For isolated boxes in a measured position, hand cutting is fine. For a wall with six outlets and three switches, the rotozip saves significant time.
Curved Cuts and Odd Shapes
Arches, curved walls, and irregular shapes require different approaches.
For gentle curves, you can score and snap in short sections, creating a faceted curve that will be smoothed by mud. This works for large radius curves but not tight ones.
For tighter curves, use a keyhole saw or jab saw. Cut from the face, following your marked line. The cuts are rougher than score-and-snap but curves don't need perfection since they'll be finished with compound.
Circular cuts like for recessed lights: drill a starter hole, then cut with a keyhole saw or use a hole saw in a drill. Hole saws give perfect circles but are limited by the sizes available.
Templates help for repeated shapes. If you're cutting ten identical circles for can lights, make a template from cardboard and trace it for each cut.
L-Cuts and Notches
Windows, doors, and partial walls require L-shaped pieces. You can't score and snap an inside corner.
For the short leg of the L: cut with a drywall saw. The saw handles the short distance fine.
For the long leg: score and snap as usual.
The sequence matters. Make the saw cut first, then do the score-and-snap cut. If you snap first, the piece isn't stable for sawing.
Uncle Frank taught me a trick for cleaner L-cuts: score the long cut deeply on both sides before snapping. This prevents the break from wandering into the short leg.
Tools for Cutting
You don't need much:
Utility knife: The primary tool. Get one with easy blade changes because you'll go through blades. Dull blades tear paper instead of cutting it cleanly.
T-square: 4-foot drywall T-square for marking cuts. The lip hooks over the edge of the sheet for perfect perpendicular lines. Worth every penny.
Drywall saw: Also called a jab saw or keyhole saw. For cutouts and short cuts where score-and-snap doesn't work.
Rotozip or spiral saw: Optional but very helpful for outlet cutouts. Cordless versions are convenient for working around the room.
Rasp: For cleaning up edges after cutting. A rough cut edge can be smoothed with a rasp before hanging.
That's genuinely all you need. I see people with elaborate cutting setups, but the basics handle everything.
Measuring Tips
Cutting is easy. Measuring accurately is where people struggle.
Measure twice, cut once is cliche but real. I've measured three times on complex cuts and still found discrepancies between my measurements. Figure out why before cutting.
Note which edge you're measuring from. My rookie mistake was measuring from the left edge to a box, then from the floor up, then measuring on the sheet from the right edge. Off by the width of the sheet.
Allow for gaps. Drywall shouldn't fit tight. Leave 1/8 inch at seams, 1/4 inch around windows and doors, 1/2 inch at floors. These gaps account for irregularities and make installation easier.
Use scrap for test fits on complex shapes. If you're not sure about a measurement, cut a small piece to check the fit before committing the full sheet.